Do you enjoy drawing faces but have trouble making the eyes look realistic? Read on to learn how to draw a realistic human eye.
Steps
Get an ordinary pencil and draw the outline of the eye hole and eyelid. It doesn't have to be too detailed or shaded yet.
Change to a darker sketching pencil. I used 5B on mine, but you can use and type of pencil. You start of by drawing the out line of the iris - it's not quite a hole circle shape unless your drawing some one with a shocked face. when you're happy with that, make a start of drawing the pupil. Remember the pupil should be close to the centre of the eye, but the iris doesn't have to be at the centre of the eye. You can also draw a reflection of a window or light or something if you want to, but that is optional.
Then you shad the edge of the iris really dark and then 1/3 of the way down, blend it slightly so the edge goes a bit lighter. Then if you've done a reflection, you need to shade darkly around that. Once you've done that, shade the top a bit more lightly and carry on until the corner so it looks a bit like a slanted triangle.
Change back to an ordinary pencil if you used a different one and underneath the shaded part under the reflection, do part of the iris. Don't do it in little section, draw it lightly in quick long strokes and go over them a few times. You may not be able to tell because of the picture quality but next to that you need to draw a smaller part of iris around the inside edge of it, but use the technique of moving the pencil in different directions - don't just shade up and down or side to side, make it look neat, but messy.
Shade around the pupil like you did with the outline of the inner iris in step 2, but with an ordinary pencil. You only need to do it a little bit, quite small. After you've done that, you make the iris look like it's getting darker, by pressing a tiny bit harder and sketching in different directions. You need to make it longer than the bit you just shaded though. The image should be big enough to explain. Once you have done this, you go back to the part of the iris underneath the reflection and add a very small bit of the shading in different directions using a darker pencil.
At the top, right hand side of the iris you need to shade in darkly with a normal pencil, diagonally, so it looks like the iris is going around and not just coloured otherwise it wont look so realistic. Then you need to shade around very lightly around the rest of the iris - shading in straight lines, but going around the pupil.
Add some eyelashes. Draw really small rounded of lines along the bottom of the eye for the lashes at the bottom and longer lines at the top for the longer eyelashes. They should be the same height at the eye lid, but you can do them longer if you want. For a better look, add light shading to around the eyelid area, simple light sketches from left to right and on the left had corner of the eye.
Tips
Take your time, there's no point rushing because it'll end up looking messy.
Don't get distracted to much - e.g talking on phone because small things like that can put you off.
Practice. You will get better. Its a fairly simple thing to draw so you will be really good the more you practice.
People are arguably the most difficult subject to draw realistically. Read on to discover the rules of drawing a realistic face as well as a realistic figure.
Steps
Draw a Face
Draw an upside-down egg, then divide it into quarters with straight lines. This is the blueprint for the head; the lines will help you position the facial features correctly, so be sure to center them well.
Don’t draw the intersecting lines in ink because you’ll want to erase them later.
Draw the eyes on the horizontal line. Be careful not to draw each eye in the exact middle of the left or right side of the face; most people’s eyes are not this widely spaced. The two eyes (excluding lids, brows, etc.) should have just enough space between them to fit a third eye.
Start by sketching big circles to give yourself a sense of where the eye sockets are. Again, don’t draw these in ink.
To begin the eyeball itself, center an almond shape within each circle.
Fill in the pupils and irises, which should be partly covered by the upper lid; completely visible irises will make your subject seem frightened.
Draw a bow-shape over each eye to suggest an upper eyelid.
Draw a smaller, shorter bow-shape beneath each eye to suggest a lower eyelid.
If you’re drawing a woman, add lashes. Resist the urge to draw them strongly vertical or across the entire upper eyelid; they should be gently arched, fairly horizontal, and only come out of the outer 1/2 to 2/3 of each eyelid.
Near the top of each eye socket, add an eyebrow. Women’s brows tend to arch higher away from their eyes than men’s, which are usually lower, thicker, and flatter.
Add a nose and mouth.
Draw the nose. An easy way to do this is to draw only the very bottom of the nose and not the sides.
To form the very bottom of the nose, draw a slightly downward-curving horizontal line. This should be centered both horizontally and vertically in the bottom half of the face.
To form the walls around the nostrils, draw a "C" shape on either side of your curved line. It may help to think of these as parentheses.
If you want to form the sides of the nose, do not draw lines; instead, suggest soft edges by adding a slight shadow with a blending stump.
Draw the mouth. The top of the mouth should be closer to the nose than the bottom of the mouth is to the tip of the chin.
To form the line between the lips, draw a gently waving horizontal line. Experiment with a few shapes to form the expression that you want.
Draw a gently M-shaped line to form the upper lip. The higher above the center line, the fuller the lip will look.
Draw a gently U-shaped line to form the lower lip. Most people’s lower lip is slightly fuller than the upper.
Once you get the hang of the lips, experiment by making them smile, frown, show teeth, etc.
You can also add wrinkles, spots, and anything else you can think of to make it look more realistic.
Erase all unwanted guide lines.
Draw a Body
Sketch the head, torso, and length of the body with lines and ovals. A proportionate body is usually the length of seven stacked heads.
Draw an upside-down egg where you want your subject’s head to be.
To one side of your paper, draw seven eggs, the top one aligning with your subject’s head.
Draw a straight line coming down from the bottom of your subject’s head. Use the stacked heads to measure how far down the line should go.
Draw a t-bar underneath the head, leaving room for the neck.
This line should be about 1/3 of a face-length away from the bottom of the head and will form the basis of the shoulders.
Be sure each half of the line is no longer than the subject’s head.
Using the t-bar as a marker, draw an oval to indicate the chest. The chest should be about 1/3 the length of the body.
Sketch a complete body structure with lines and ovals.
Draw lines down from the t-bar to indicate arms. Make sure that they aren't stock straight; no one has arms that don't bend a bit at the elbow, even when still.
At the bottom of the chest-oval, draw a rectangle to indicate hips. Note that the hips will be different, depending on whether you're drawing a man or a woman.
For the legs, draw lines down from the left and right corners of the hip box.
The knees will be about two stacked oval lengths down the legs.
The calves will be roughly the length of 1 1/2 ovals.
Draw ovals to indicate feet.
Flesh out your person. Unless you’re drawing a nude, be sure to plan your subject’s outfit.
Draw lines to indicate a neck. Remember that men usually have thicker necks than women.
Add clothes. Be sure to include folds and wrinkles so that they look realistic.
Keep in mind when that the clothing should show body structure underneath. In other words, the wrinkles in the clothing should flow with the form of the body.
Clothing your subject is a great way to avoid drawing troublesome body parts. For example, if you haven’t perfected drawing hands – and who has?! -- simply put your subject’s hands in their pockets. Add scarves, boots, skirts, and other accessories as needed.
If you decide to draw a nude, pay extra attention to defining muscle structure.
Erase all unwanted guide lines.
Video
Tips
The best way to improve, in all cases, is to draw from life. Find a real-live thing to draw, or at least a picture, and get to it!
If you're still having trouble with the torso, draw the outline of the rib cage before you start on the final body lines. This will help you see where the pecs and six-pack (or gut) go.
Always add little bits of shading as you draw to add depth and improve your drawing skills.
Consider joining websites such as deviantART to share your art, study others', stay motivated, and get feedback and advice on your work.
Trace over pictures of people with tracing paper for practice. When you get better, draw by copying the pictures and pay attention to how you're placing or emphasizing the details.
Use plain copy paper if you are just getting started.
A number 2 pencil is fine for most drawings.
Use vine charcoal to do loose sketches and to place the lines for faces, etc. Be forewarned that too much shading can make a face look old.
Borrow library books on pencil and charcoal drawing and study the techniques of others. Many will have lessons on shading and other subjects that can teach you a lot. Just remember that no one book, or artist, can teach you the 'perfect' way to draw. Everyone has different styles; learn from them, but use it as a springboard to creating your own style. And most important of all: practice, practice, practice!
Warnings
When drawing from life, try not to rely too heavily on movie stars and other famous faces for inspiration. Not only will that irritate more advanced artists who are critiquing your work (as it is a very common approach), but it is just as important to be able to draw an average man on the street as it is to be able to draw Brad Pitt.
Lions have always been symbolic of ferocity and strength, not to mention the central characters of one of the best Disney movies of all time. Learn to draw the biggest cat in Africa in these easy steps!
Steps
Draw the head. Sketch a circle connected to a smaller one. Sketch in a guide for the facial features.
Draw two round-edged squares for the ears. Put another smaller set inside for each ear.
Sketch in the eyes, nose and mouth. The mouth should slant to the right of the face in such a way as to almost make your lion look like a bear.
Draw three ovals as guides for the body. Make a small one for the neck and two large ones for the body.
Draw a large enough oval that will overlap both the head and body. This will serve as a guide for the mane. A male lion's defining feature is its mane, as it makes it look bigger, so really emphasize that aspect!
Add in three large ovals for each leg. Draw a small circle for each foot with small ovals for the paws.
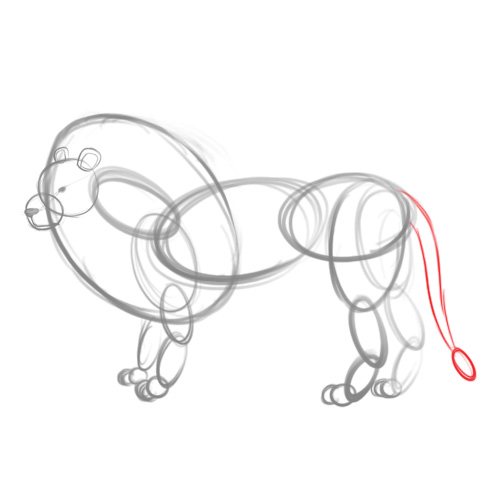
Add in two thin lines for the tail, and an oval for the hair.
Now sketch in the details, add fur if you want. Don't forget the mane!
Outline the whole image. Erase any unnecessary guidelines.
Color it in! Use mostly gold and brown hues, unless your lion is of the imaginary sort.
Tips
Draw lightly in pencil so that you can easily rub out mistakes.
If you want to use markers/watercolors to color your drawing, use paper that is relatively thick and line over your pencil more darkly before doing so.
Article provided by wikiHow, a wiki how-to manual. Please edit this article and find author credits at the original wikiHow article on How to Draw a Lion. All content on wikiHow can be shared under a Creative Commons license.
What's a big cat with stripes that doesn't meow? It's certainly not Garfield! Here's a quick tutorial on how to draw a tiger!
Steps
Draw a few basic shapes to start. Sketch the head using a large circle and within that draw another to serve as the snout. Add circular facial guidelines to help you with features in subsequent steps.
Draw two round-cornered triangles for the ears and another smaller set of triangles inside that. Draw a diamond shape for the nose and an inverted "Y" shape for the mouth. Add in two small circles for the eyes.
Draw three ovals as guides for the body. Draw a small one for the neck and two large ones for the body.
Add in three large ovals for each leg. Put a small circle for each foot, with small ovals for the paws.
Add in two lines for the tail. They should be thicker at the base, tapering off to a slightly rounded end.
Sketch in the details. Add fur, whiskers, and claws. Don't forget the tiger's trademark stripes!
Outline the image and color it in! Make sure all excess guidelines are erased, and use mostly orange/brown with darker stripes for the body.
Tips
Draw lightly in pencil so that you can easily rub out mistakes.
If you want to use markers/watercolors to color your drawing, use paper that is relatively thick and line over your pencil more darkly before doing so.
Article provided by wikiHow, a wiki how-to manual. Please edit this article and find author credits at the original wikiHow article on How to Draw a Tiger. All content on wikiHow can be shared under a Creative Commons license.
A black panther is one of the fiercest cats in the jungle. By following the steps below you can learn to draw one for yourself!
Steps
Draw a large circle for the head. Add a smaller one for the snout and put in guidelines for the facial features.
Draw details. Sketch two half-circles for the eyes, a curvy triangle for the nose, an inverted "Y" shape for the mouth, and two triangular shapes for the ears.
Draw an oval for the neck. Add two larger ones for the sections of the body, one tilted upward into the juncture of the neck and one horizontal.
Draw three ovals for each leg. Add in paws and a long, muscular tail. Don't make any of these body parts particularly streamlined--the panther might seem sleek, but it's a powerful animal.
Outline the panther and erase guidelines. Make sure to emphasize the elements of the face and feet that distinguish the stealth of the panther.
Color in your drawing. Use black or very dark blue for the body, and piercing yellow for the eyes.
Tips
Draw lightly in pencil so that you can easily rub out mistakes.
Article provided by wikiHow, a wiki how-to manual. Please edit this article and find author credits at the original wikiHow article on How to Draw a Black Panther. All content on wikiHow can be shared under a Creative Commons license.
This is a basic way to teach a younger or less experienced artist to shade realistically with graphite, and eventually other media as well.
Steps
Draw with a hard leaded (2H) pencil the outline of what you want. Every time it changes color, shade, or shape, or there is a shadow, sketch this in, lightly. Proportions are all that matter here, not colors.
Pick the darkest part. This will be shaded black. By choosing black for your darkest color, it increases the contrast throughout the picture. Sometimes you want an especially light picture, as though staring at snow or a bright light. In this case, chose a medium grey for this, but usually, black is good.
Shade all parts this color with a 4- or 6-B pencil, while pressing hard. This will give good, dark color.
Choose things that are a smooth texture, and a medium tone. Shade these in next. When shading an area, go right up to the outline and over it by a little. When the art is done, those original outlines should be invisible. Instead, it should just be where a medium grey touches a dark grey, or where white touches grey, but not a line.
Shade down a light basecoat of the lightest color for texture. Using a shard, somewhat hard pencil (HB, H, B) add on the texture as a darker layer. If it is a mostly dark texture, you can do a dark basecoat and texture with an eraser, but this is harder to control.
Keep adding more shades to blend it until it looks smooth, with clean transitions.
If you shaded an area too dark, lighten it with a kneaded putty eraser. Stretch it, squish it to the shape of the area you want to lighten and press it. Then peel it off. Stretch, squish, press and peel again until it's lightened to the degree you want, then shade around it to repair or change the edges of the highlight area. You can even "draw" into a heavily shaded area with a kneaded eraser. It's fun!
Keep in mind, hard edges, like a kitchen knife or a CD should have a very sharp, distinct transition from darker to lighter at the edge, moderately angular surfaces like shoebox corners should have a quick but not immediate transition, and rounded objects like an orange should have a very gradual change in shade. Shadows on such objects behave the same way.
Erase any unnecessary guidelines when you are finished.
Sign in the bottom corner, and spray with a fixatif/ fixative. You can buy these at a craft store. Test first, and follow the directions. This will keep the art from smudging.
Mount this in a frame, and if you can, matte your artwork. If you aren’t able to, buy a precut matte or get it professionally matted instead.
Video
Speed drawing video demonstrating the use of realistic shading.
Tips
Work slowly, and always start too light. It's easier to add pencil than remove it.
For extra effect, highlight an area with colored pencil, then use a coordinating matte in the frame. For example, you could draw a rose in graphite, color the flower red but leave the stem and leaves grey, and use a red-in-black matte, inside a silver frame. The silver and black coordinated with the graphite, the red accentuated the flower.
Pencil/graphite hardnesses go from hardest to softest in the following order: 6H, 4H, 2H, H, HB, B, 2B, 4B, 6B, 8B. HB is also called No.2. See Choose a Pencil for more information.
DO NOT blend or smear with your finger. The oils can damage paper. If you can't find tortillons, use a tissue.
Cross-hatch - crossed parallel lines.
Hatch - parallel lines to infinity.
Warnings
Softer graphite is harder to control and will smudge more easily. However, harder leads will cut the paper more often and are harder to get contrast with, along with being less blendable. Use HB or softer.
Don't smear the graphite to blend it. It may leave smudges around the drawing. Use a tortillon to blend so that smears are prevented.
Do you want to build up your drawing skills? Whether you dream of becoming a great artist or are looking to give your own imagination a creative outlet, drawing is a beautiful way of expressing your individuality and observing the details of the world around you. This article will help you.
Steps
Draw what you see. Start with simple objects (like the classic bowl of fruit) or common objects and progress to more complicated subjects--an intricately shaped table, for instance, or people's faces. The better you get at drawing real-life objects, the better you'll eventually be at putting ideas on paper. For example, let's say you get an idea for a comic book character. You can imagine every detail--the expression on their face, the emotion in their eyes, the pose that represents who this character is. If you haven't been practicing with drawing faces, eyes, and poses, however, you'll have a hard time recording this character on paper in a way that matches with the image you have in your head.
Make a rough sketch. If you're drawing a tree, don't draw one leaf at time. Imagine what you want the tree to look like ultimately, and make a light sketch with a pencil. You can draw an outline of your intended drawing, or you can draw its "skeleton" (as is often done with drawing bodies). Another option is to imagine the basic shapes the object is made of. In other words, break the object apart with your mind. A tree, in most cases, is an oval or triangle centered on top of a cylinder. Draw both shapes in 3D so that you can fill in the details later, while maintaining the proportions you want. Otherwise, it's easy to get caught up in drawing one section of the object and forget about the "big picture" so that you end up running out of room, or, more often, your drawing ends up looking unattractively imbalanced.
If you're drawing a real object, cross check what you have on paper with the original object. Make sure that the sizes of the shapes relative to each other are as accurate as possible.
Elaborate. Use heavier/darker line to bring out the parts of the drawing you need, and use an eraser to take out the lines you don't need. Add details, bit by bit, making sure to frequently step back and look at your drawing as a whole to make sure it's coming along the way you want it to. Learn and experiment with several techniques, which can enhance your ability to express ideas through drawing:
Shading - Details the curves and/or shape of an object through the differentiation between light and dark. Think about the way the light hits an object and which parts of the object are light or dark as a result. This can add luminosity, intensity, and depth to a drawing.
Perspective - Things that are further away appear smaller. If you are drawing a large object (such as a building) or a complicated scene (such as a neighborhood), it's especially important to understand perspective (if you don't want your drawing to appear cartoon-ish), but focusing on perspective when drawing small, simple objects (a cube, a stack of books) is an excellent exercise in drawing.
Proportions - The way different parts of the object relate to each other in terms of size can affect how realistic the drawing is perceived to be. Altering proportions (by exaggerating some aspects and minimizing others) can convey unique ideas, or represent a certain style of drawing (especially with characters, as is seen in caricatures and anime).
Color - Adds a new dimension to a piece. Contrast, blending, saturation, and color schemes make some drawings more lively, or more realistic, or abstract, depending on how the color is applied.
Tools - Different shades of pencils (HB,2B,3B,4B...), using a sharp point, blunt point, the side of the pencil, pens, felt-tip pens, chalk, and so on.
Draw as often as you can. The more you practice, the better you'll get. Even when you're concentrating on something else but your hands are free (such as when you're on the phone--the perfect opportunity to doodle) take a piece of paper and a pencil and start drawing basic shapes (circles, squares, triangles, rectangles, etc.). Challenge yourself progressively by making these shapes as perfect as possible. Then challenge yourself some more by drawing variations of a shape: different sizes of circles and squares, different kinds of rectangles and triangles. With enough repetition (and crumpled sheets in the recycling bin), you should reach a point where you could comfortably draw most shapes. To heighten this basic skill, draw curves and curls as well. Try doing springs and spirals and various loops, curlicues and garlands, paying attention to the consistency of your curves.
'Keep your work. Make a place where you can put all of your drawings, or keep it all together in an art journal. Doing this will help you review your progress. The more you get used to drawing, the more you'll be able to see what your flaws are and determine how to correct them. Also, as you continue drawing, you'll develop your own personal style. It's always interesting to look back and see how your ability to express yourself has grown. Don't let yourself down. When you practice you can make it perfect.
Try a timed gesture drawing. If you find yourself struggling with proportion, annoyed that your poses are stiff and worst of all making and erasing mistakes that your conscious mind knows better, this is a great way to break that cycle. Get a kitchen timer. Set it for five minutes. Choose a subject that's not going to move like a silk rose, something a little challenging that you're fond enough of it to draw it more than once. It helps if you really like the subject. Using a soft (B grade or 2B or 4B, any of the B pencils) pencil, try to sketch it within five minutes or two minutes, set a specific time period no longer than five minutes. When the buzzer goes off, stop even if it's not finished. Try again on a fresh part of the page.
Each time you try to draw something within five minutes, you'll observe something different about it and concentrate. You'll be correcting mistakes without bothering to go back and erase them.
This method is especially good for drawing people since it's not hard to get a friend to pose for a two minute "gesture sketch" as opposed to making them sit still for an hour.
Once you have done gesture sketches of a subject, giving yourself a longer time like fifteen minutes will feel like you have forever to get it right. You'll probably finish before the time is up. This is very good practice for being able to draw outdoors when the light can change in half an hour.
Try drawing your cat or dog while it's sleeping in short gesture drawings. Two minutes is about as long as a sleeping animal holds still before it rolls over or moves in its sleep.
Try drawing something simple like a pencil. Things that are common and easy to draw. Practice the object you chose a few time until it looks right like it is supposed. Then once you think it looks right go onto harder things such as a human face. Now to start your human face you must start with regular shapes like a circle. Most common heads are shaped like an upside down egg.
Video
Speed drawing of a realistic portrait.
Tips
Keep trying and don't give up if you do poorly the first time.
Date every sketch and drawing. It's good for morale to see how much you've improved, over weeks and months progress can become dramatic.
The secret to making professional quality drawings is to include line, shape, value, texture, and color. Most everyone starts with lines which they use to create shapes. Often beginners stop there. A drawing should have something in it that is completely white, something pitch black, and many values in between. You should show what in the drawing is smooth and what is rough. Adding even one or two colors to a gray pencil drawing will add a lot of interest.
Use measuring techniques like a grid method or tick marks for accurate proportions. This is something that gets better with practice at a particular subject like people or cats or birds.
Another secret to drawing realistic pictures is trying to make them look three-dimensional. This is done not only with shading but texture and the direction of lines. For example, if you draw a ball, make the lines curved.
The joy of drawing is being able to draw freely, so go easy on yourself when you feel you're not progressing as fast as you want to. It's always OK to make mistakes. Even the best artists make mistakes when they're drawing as part of routine.
Vary what you draw. For instance, work on drawing inanimate objects, then take a break and work on people the next day. This keeps your brain fresh and prevents you from becoming frustrated.
Remember, as the famous author James A. Owen once said, "Drawing is just two things, putting lines on paper, and deciding where they go."
Art students that wish to stand out from the rest of the class should draw with colored pencils.
Use 'rough' paper and pencil that's used on one side for your doodles or practice sketches. Save your money and trees by saving good paper for your best work.
Also, one of the best things you can start out doing is just doodling! And once you finish doing that, move on and then start being a critic to your work, add detail and soon you're on your way.
Also, when you slant the lead (or graphite) of your pencil, those can be used as shading techniques.
Find inspiration in everything. News stories, landscapes, emotions, anything can be drawn realistically or abstractly.
Some of the best art has the best shading. If you master shading you're off to a great start. Remember practice makes perfect.
Pay attention to critique and use it to improve. It's common for amateurs to take offense from critique, but usually, it's not meant badly. Acknowledge flaws in your art and try to overcome them.
Take an art class. You can learn many techniques and tips from professionals. Don't be afraid about your talent level- art class isn't about showing off, it's about learning and sharing new things from others.
Remember that your best is your best. Do not compare yourself against other professional work.
Drawing is an art, and takes great precision, but you can learn to draw. You don't have to be naturally good at it, you just have to be able to take some time to learn!
Warnings
Show your work to other people at your own risk--you should only present your work to those you know who'll encourage you. Ask them to be honest, then improve using the feedback.
People may very well make fun of you; ignore them. If they knew anything about art they would know that drawing takes a lot of hard work to succeed at it.
Always be open to critique if you are going to show your work.
It is recommended to draw larger because as drawings get smaller and smaller, even a minor blister or mark here and there can dramatically alter its appearance, especially if you are drawing a face.
it's also recommended to draw small images if you don't know exactly how the final drawing should look like: they do take less time to draw, and you don't have to go into detail at your first sketches.
Learn to distinguish helpful critique from discouragement. Critique is always specific and usually provides suggestions to improve. Discouraging comments get personal, may include insults and tell you things like "give up, you have no talent." Ignore and avoid any discouraging responders. Show your art to people who draw better than you do for helpful critique.
Article provided by wikiHow, a wiki how-to manual. Please edit this article and find author credits at the original wikiHow article on How to Draw. All content on wikiHow can be shared under a Creative Commons license.