Wednesday, May 9, 2012

How to Draw a Parrot


How to Draw a Parrot

from wikiHow - The How to Manual That You Can Edit
Parrots are predominantly green in color but many of them are brightly multi colored. They are also among the most intelligent of birds since they can copy the voices of humans. If you want to learn how to draw them, follow then this simple tutorial on how draw a parrot.


Parrot-Intro

Steps

  1. Draw a succession of circles and ovals to form the body of the parrot. Sketch a vertical line to serve as a guideline on your drawing.

    Parrot-Circles-Step-1
  2. From your drawn circles and ovals, form the body by connecting your drawn shapes and erasing inside lines. Start drawing also his eyes, nose and curved beak.

    Parrot-EyesBeak-Step-2
  3. Draw his feet and wings. They usually have sharp clawed feet and for this picture the parrot’s wings are rested on its side.

    Parrot-WingFeet-Step-3
  4. Draw the details of his body or his feathers. Start by drawing first the details on its tail by sketching curves and half circles to represent the parrot’s feathers.

    Parrot-DetailsTail-Step-4
  5. Move to its rested wing and draw also curves and half circles for the parrot’s feathers.

    Parrot-DetailsWing-Step-5
  6. Sketch lines on the rested wing to finish that part of the drawing and then draw again some half circles on some parts its body.

  7. End your drawing by sketching a piece of branch that the parrot is clutching and resting on.

    Parrot-Branch-Step-7
  8. You can now outline your drawing. Outline by sketching thick lines or by using a black pen and marker. Erase inside lines and guidelines while you are outlining.

    Parrot-Outline-Step-8
  9. Color it! Use different variations of green and then small splashes of red, yellow orange and blue.
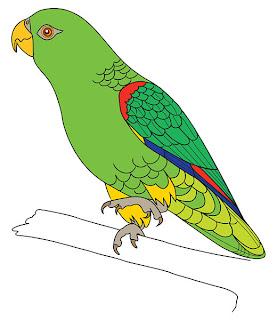
    Parrot-Color-Step-9

Related wikiHows

Article provided by wikiHow, a wiki how-to manual. Please edit this article and find author credits at the original wikiHow article on How to Draw a Parrot. All content on wikiHow can be shared under a Creative Commons license.

Thursday, May 3, 2012

How to Draw a Golden Retriever


How to Draw a Golden Retriever

from wikiHow - The How to Manual That You Can Edit
Golden retrievers are some of the best family pets around. They are beautiful, playful, and gentle dogs, and very loyal to their owners. This tutorial will show you how to draw a realistic Golden Retriever.
Golden-retriever-Intro

Steps

    • Sketch the head. Draw a vertical oval with guidelines, with a smaller circle inside the oval, towards the lower part. This will become the snout of the dog.
      Golden-retriever-Sketch-an-oval-and-a-circle-for-the-face-Step-2
  1. Make the neck and the body. Draw two lines coming down from the head. Connect these lines with a semicircle, which will serve as the neck. Add a large oval at his left side, connected to the neck by an overlap with the semicircle.
    Golden-retriever-Sketch-neck-and-body-Step-3
  2. Add in the legs. Each one is different, so be careful about your technique--
    Golden-retriever-Sketch-legs-Step-4.jpg
    • Draw a circle over the body and neck shapes (only for the right-visible-leg). Draw down from the circle a long tubular shape (the left leg should be drawn straight from the dog's body). Finish each front leg with a small oval for the paw.
    • For the back legs draw a big oval over the body and another one showing only under the body. Sketch a vertical tubular shape down from each of these ovals. Finish each back leg with a small oval for the paw.
  3. Shape the head and neck. Outline the shape of the head and add facial features. Draw hanging ears, small eyes, a big nose, and a opened mouth with with a tongue sticking out. Draw some fur on the dog's neck.
    Draw-and-detaille-the-face-Step-5
    • You may want your drawing to have a different personality than the dog shown here, so alter your personal details to accommodate that.
  4. Make the body. Continue outlining over the sketch. Finish up the body with a fuzzy tail.
    Golden-retriever-Draw-and-detaille-the-body-Step-6
    • Don't draw one smooth, hard line for the outline; use short, light strokes that suggest hairs (look at the illustration for reference).
  5. Carefully erase the sketch and strengthen the lines. Don't erase lines that depict fur, unusual as they may look--your dog would look much stranger without a single tuft on it.
    Golden-retriever-Strengthen-the-outer-line-Step-7
  6. Color in your drawing. Use bright colors, like the golden yellow seen here. Make your Retriever's coat lightest on its stomach, darkest on its back, and remember to give its tongue a lively pink coloring!
    Color-golden-retriever-Step-8

Tips

  • Draw lightly in pencil so that you can easily rub out mistakes.

Related wikiHows

Article provided by wikiHow, a wiki how-to manual. Please edit this article and find author credits at the original wikiHow article on How to Draw a Golden Retriever. All content on wikiHow can be shared under a Creative Commons license.