
How to Draw a Human Nose
from wikiHow - The How to Manual That You Can EditWhat's in a nose? Quite a bit when it comes to portraiture and figure drawing! The nose can make or break a drawing of the human face, but learning to do so properly is much easier than one might think, even for a novice doodler!

Steps
- Study the human face. Pick up reference material on anatomy. You can find fantastic books geared specifically toward figure drawing from an anatomical perspective that will give you a better idea of how human beings are put together. The works of Leonardo da Vinci and Henry Gray are wonderful to study because they are both artful and anatomically accurate.

- It also helps to work with a subject, be it a live human being, or a photograph. Try to really draw what you see, (which is a challenging skill to acquire in and of itself) and not simply copy the movement your hand is used to. If you are simply sketching an image from your head, though, there are still some basics that can help us all create a realistic looking nose. Remember that no two faces are exactly the same, and no face is 100% symmetrical. Human beings are comprised of organic matter, and we are all delightfully imperfect! There are many variations on the human nose, but this guide will give you a basic idea of how to create a "beginner's nose."
- It's best for this exercise to work in pencil and use a light touch so that guiding lines can be erased easily. Instead of using a No. 2 pencil, you might want to use a 4 or greater to create finer lines.
- Draw the basic framework of the head before you draw any facial features. This will allow you to determine how your face will be situated. Will your person be looking up, off in the distance, or directly facing the viewer? There are many variations to consider, and they will all affect proportion and perspective.
- It's easiest to draw a profile (a person looking away, so we view the side of the face) or straight on, as if you were having a conversation with your subject. For this guide, we'll assume you're looking straight on. Draw an egg shape, with the widest part of the egg at the top, with the narrowest part on bottom, where the chin will be. Yes, facial shape will vary widely from person to person, but this is just to get an idea for proportion.
- Draw the basic framework of the head before you draw any facial features. This will allow you to determine how your face will be situated. Will your person be looking up, off in the distance, or directly facing the viewer? There are many variations to consider, and they will all affect proportion and perspective.
- Next, draw a line directly down the middle of the egg shape from top to bottom, so the egg looks bisected.

- Draw another line across the middle of your egg from left to right. Generally speaking, the eyes should be along that middle "equator" line, and the nose will start just above this line. If you prefer to draw the eyes in first, (which I do,) this can help keep your proportions in check.

- Start the first line of the bridge of the nose, just above that equator. Bring it down into a "j" shape, the bottom part of the j being about halfway between the equator and chin.

- Continuing that j, draw a small curve at the bottom edge that will be the hole of one of your nostrils.
- Draw a small semi-circle on the other side of the curve of the j for the other nostril.
- Draw two semi-circles above the others you already made to complete the top, cartilaginous part of the nostril.
- This process can be amended and modified according to your own style, but this should give you a basic nose shape without too much strain and effort. Again, it's best to start off with a light touch so you can erase and try again if your proportion looks a bit off.
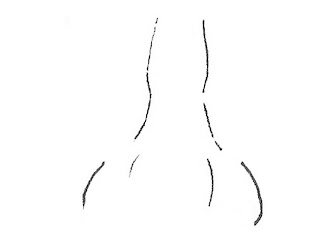
- A different and more realistic technique (that can be slightly more challenging) is to begin drawing one side of the bridge of the nose from above the equator, then stop your line about halfway between the equator and the chin. Do the same on the other side of the bridge of the nose. You should now have two lines on either side of the "prime meridian" line on your face.
- This process can be amended and modified according to your own style, but this should give you a basic nose shape without too much strain and effort. Again, it's best to start off with a light touch so you can erase and try again if your proportion looks a bit off.
- Draw a circle at the base of these two lines, where you stopped in between the equator and chin.
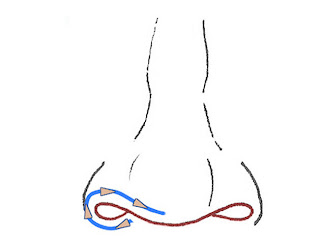
- Draw two smaller circles toward the bottom of the circle you just drew for the holes of your nostrils.
- Draw a semi-circle over the smaller circles you just made to create the fleshy part of the nostrils.
- This will look more natural once you've mastered it, so as with all artistic endeavors, practice makes perfect!
- This will look more natural once you've mastered it, so as with all artistic endeavors, practice makes perfect!


Tips
- Work with a fine-toothed, smooth paper to keep lines strong and smooth.
- If you don't normally, place the fattier part of your palm on the paper for stability when you draw, using your other hand to hold the paper in place. This should help keep your hand steady when drawing in general. Just be sure to work from left to right if you are right handed or right to left if you are left handed so you don't smudge. This will also help if you wish to go back over your lines with ink.
- If you wish to work with ink, Micron pens are amazing because the ink dries incredibly fast and is waterproof, so you can add watercolor or other media later if desired.
Related wikiHows
- How to Draw a Human Head
- How to Draw a Brain
- How to Draw Footprints
- How to Draw a Realistic Female Eye