Tuesday, April 24, 2012

How to Draw a Deer


How to Draw a Deer

from wikiHow - The How to Manual That You Can Edit
Deer can be found everywhere, from a silhouette on a road sign to a painting of a nature scene. This simple tutorial will teach you how to draw one.
how to draw deer

Steps

  1. Draw the head. Sketch in two circles, a large one and a small one. Connect the two circles with a line, like so. Put in some guidelines for the eyes, nose and mouth.
    how to draw deer - step 1
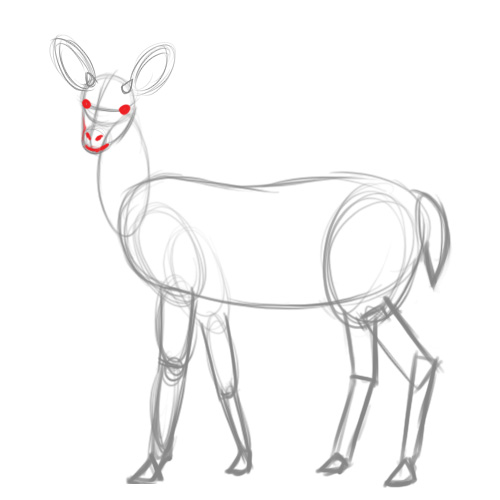
  2. Create two ovals for the ears and smaller ovals within those for the inner ears. In front of that, draw two small triangles for the horns. (Antlers can be difficult to draw, so we’ll hold off on them for now.)
    how to draw deer - step 2
  3. Draw an oval for the neck and connect that with a slanted, much larger oval for the body. The deer’s body should not end up as an oval, so don’t worry if your oval here isn’t flawlessly shaped. In fact, if you want to curve your oval so it looks more realistic, go ahead.
    how to draw deer - step 3
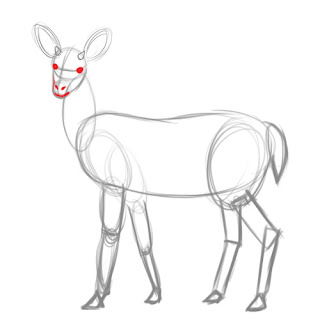
  4. For the front legs, draw two ovals for each and connect them to two thin long rectangles. For the back legs, draw a much larger oval connected to two long, thin rectangles. Draw in triangles for the hooves. (Refer to the illustration for the placing of each shape.)
    how to draw deer - step 4
  5. Draw the tail. You should sketch it in a manner similar to what’s shown, but it's up to you how long it should be.
    how to draw deer - step 5
  6. Sketch in the eyes and snout. Be careful especially with the eyes, making them almond shaped but not too small (unless you’re going with the “deer in headlights” look) with discernible pupils.
    how to draw deer - step 6
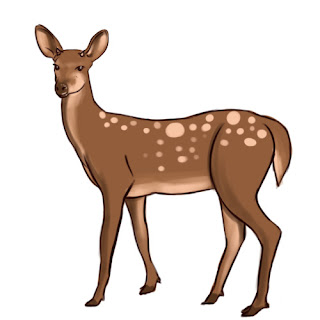
  7. Outline the whole image and erase guidelines. Be very careful with this step, since you don't want to erase any lines that you actually need.
    how to draw deer - step 7
  8. Color your drawing. Put in some shadows and shading, as well as the occasional spot.
    how to draw deer - step 8

Tips

  • Draw lightly in pencil so that you can easily rub out mistakes.
  • Bambi is an excellent reference point for observing the figure of a deer, particularly to see how it changes over the years as Bambi grows up. Watch the movie and pause at different points to look at deer in the midst of activity, lying down, etc. This will provide you with a better overall understanding of the way deer look, and you’ll be able to draw one more effectively next time.

Related wikiHows

Article provided by wikiHow, a wiki how-to manual. Please edit this article and find author credits at the original wikiHow article on How to Draw a Deer. All content on wikiHow can be shared under a Creative Commons license.

Friday, April 20, 2012

How to Draw Bambi


How to Draw Bambi

from wikiHow - The How to Manual That You Can Edit
Is Bambi your favorite Disney movie? Here's how to draw everyone's favorite cartoon deer in a playful, happy mood.
Bambi pencil draw

Steps

  1. Draw the head. sketch a large circle with a small oval for the snout. Add in guidelines for the facial features.
    Bambi-Head-Step-1
  2. Draw a large oval. Inside that, draw two smaller ovals. These will be the eyes. Draw a circle and a very small one inside that for the pupil. Don't forget to add eyelashes!
    Bambi-Eyes-Step-2
  3. Sketch Bambi's hair by putting tufts right on his head. Draw an oval for the nose. Sketch the mouth and add two large ovals for the ears.
    Bambi-Faccial-features-Step-3
  4. Draw a rectangle for the neck. Connect the head to two overlapping circles that will be the body. Add in a fluffy tail pointing up into the air.
    Bambi-Body-Step-4
  5. Draw three thin ovals for the front legs. Each should be bent at a slight angle and end with a small square for the hoof.
    Bambi-Front-legs-Step-5
  6. Sketch two ovals for each back leg. Connect the ovals to long, thin rectangles. Bambi's back right leg should bend backwards almost at a ninety degree angle before trailing down into a rectangle. End each leg with a square for the hoof.
    Bambi-Back-legs-Step-6.jpg
  7. Add details such fur, spots, the outline of the face, etc. Follow the accompanying illustration to help you out.
    Bambi-Add-details-Step-7
  8. Color the finished product. Bambi's fur is a warm brown color, and his spots are cleanly white. Try to put a sparkle in his eye and make his nose slightly upturned in an excited way.
    Bambi-Color-Step-9

Tips

  • Draw lightly in pencil so that you can easily rub out mistakes.
  • If you want to use markers/watercolors to color your drawing, use paper that is relatively thick and line over your pencil more darkly before doing so.

Related wikiHows

Article provided by wikiHow, a wiki how-to manual. Please edit this article and find author credits at the original wikiHow article on How to Draw Bambi. All content on wikiHow can be shared under a Creative Commons license.

Tuesday, April 17, 2012

How to Draw Realistic Panda Bears


How to Draw Realistic Panda Bears

from wikiHow - The How to Manual That You Can Edit

Did you know that Giant Pandas are already endangered? Though they may be cute, wild pandas are strictly territorial and can become aggressive if someone encroaches on their territory. Pandas are actually carnivorous in nature but they favor eating bamboo.
Learn to draw your own panda with these easy steps!

Panda pencil drawing

Steps

  1. Sketch in a circle for the head, and 2 large ovals for the body. Add in guidelines.

    Panda-Circles-for-head-and-body-Step-1

  2. Sketch in ovals for the legs and small ovals for the paws.

    Panda-Legs-Step-2

  3. Now start sketching and adding in details. Draw 2 small eyes, draw an oval for the snout with a curvy triangle for the nose. Add curvy triangles for the ears as well.

    Panda-Facial-features-Step-3

  4. Sketch in fur and color separations as shown. Also give detail to the paws, add claws.

    Panda-Fur-and-details-Step-4

  5. Outline the panda and erase guidelines.

    Panda-Outline-Step-5

  6. Color it in! Add some shadows and you are done! You've just drawn your very own Panda!

    Panda-Color-Step-6


Related wikiHows

Article provided by wikiHow, a wiki how-to manual. Please edit this article and find author credits at the original wikiHow article on How to Draw Realistic Panda Bears. All content on wikiHow can be shared under a Creative Commons license.

Sunday, April 15, 2012

How to Draw an Angry Face


How to Draw an Angry Face

from wikiHow - The How to Manual That You Can Edit

Do you need to add some expressions to the characters you draw? Here is a tutorial to show you how to draw an Angry Face. Just follow these easy steps.

Pencil-Draw-Angry-face

Steps

  1. Draw a big circle.

    Angry-face-circle-Step-1

  2. Draw rectangle. This will act as a jaw from inside the circle protruding downwards.

    Angry-face-rectangle-Step-2

  3. Draw 2 ovals for the ears on each side of the rectangle. Draw a triangle below the rectangle for the chin.

    Angry-face-ears-and-chin-Step-3

  4. Find the center line. Draw a line across the top of the ears.

    Angry-face-center-line-Step-4

  5. Draw 2 more guidelines. 1 should be across the middle of the ears and 1 below them.

    Angry-face-eye-line-nose-line-Step-5

  6. Use your guidelines to draw the eye sockets by drawing 2 circles between the top and the second lines. The nose tip is on the third line. The nose should be diamond shaped.

    Angry-face-sockets-and-nose-Step-6

  7. Add the details. Since this is an angry face, draw the eyes wide, almost diamond-shaped (not too circular). Draw 2 diagonal Lines going toward the nose for the eyebrows. Make sure to add wrinkles on the forehead where the eyebrows meet.

    Angry-face-eyes-Step-7

  8. Draw the details for the nose. First, draw the desired size of nostrils using triangles. Then, draw curved lines to show the nose. Add lines at the side of nostrils for some flare.

    Angry-face-nose-Step-8

  9. Draw a rectangle below the nose and curve it a bit. This is the mouth. It should be drawn with open lips but with the teeth clenched tightly together.

    Angry-facemouth-Step-9

  10. Ink the drawing then erase the sketch.

    Angry-face-ink-Step-10

  11. Color your drawing.

    Angry-face-color-Step-11


Tips

  • You can open add red veins to the eyes to make the face seem even angrier.
  • Adding wrinkles where the brows meet and the top of the nose also intensifies the emotion.

Related wikiHows

Article provided by wikiHow, a wiki how-to manual. Please edit this article and find author credits at the original wikiHow article on How to Draw an Angry Face. All content on wikiHow can be shared under a Creative Commons license.

Friday, April 13, 2012

How to Draw a Laughing Face


How to Draw a Laughing Face

from wikiHow - The How to Manual That You Can Edit

Do you need to add some expressions to the characters you draw? Here is a tutorial to show you how to draw a laughing face. Just follow these easy steps.

Laughing-face-Intro

Steps

  1. Draw a big circle.

    Laughing-face-circle-Step-1

  2. Draw a rectangle that will act as a jaw from inside the circle protruding downwards.

    Laughing-face-rectangle-Step-2

  3. Draw 2 ovals for the ears on each side of the rectangle. Draw a triangle below the rectangle for the chin.

    Laughing-face-ears-and-chin-Step-3

  4. Find the center line . Draw a line across the top of the ears.

    Laughing-face-center-line-Step-4

  5. Draw 2 more guidelines: 1 across the middle of the ears and 1 below them.

    Laughing-face-eye-line-nose-line-Step-5

  6. Using your guidelines, draw the sockets by drawing 2 circles between the top and the second lines. The nose tip should be on the third line. The shape of the nose is a diamond.


  7. Draw the details. Since this is a laughing face, draw 2 curved lines for the eyes in the middle of the sockets. in the top part of the socket draw another set of curved lines for the eyebrows.


  8. Draw the details for the nose. Draw the desired size of the nostrils using triangles then draw curved lines to show the nose, as seen in the image.


  9. Draw the mouth open, forming a horizontal "D" shape. Laughing is differentiated by opening the mouth widely, showing the teeth and tongue to maximize the effect.


  10. Ink in the drawing then erase the sketch.


  11. Color your drawing.

    Laughing-face-color-Step-11


Tips

  • You can open the eyes a bit, it still shows laughter
  • Don't be afraid to widen the mouth a bit, it depends on what effect/style you are after (ex exaggeration, realistic, etc...)

Related wikiHows

Article provided by wikiHow, a wiki how-to manual. Please edit this article and find author credits at the original wikiHow article on How to Draw a Laughing Face. All content on wikiHow can be shared under a Creative Commons license.