How to Draw
from wikiHow - The How to Manual That You Can EditDo you want to build up your drawing skills? Whether you dream of becoming a great artist or are looking to give your own imagination a creative outlet, drawing is a beautiful way of expressing your individuality and observing the details of the world around you. This article will help you.

Steps
- Draw what you see. Start with simple objects (like the classic bowl of fruit) or common objects and progress to more complicated subjects--an intricately shaped table, for instance, or people's faces. The better you get at drawing real-life objects, the better you'll eventually be at putting ideas on paper. For example, let's say you get an idea for a comic book character. You can imagine every detail--the expression on their face, the emotion in their eyes, the pose that represents who this character is. If you haven't been practicing with drawing faces, eyes, and poses, however, you'll have a hard time recording this character on paper in a way that matches with the image you have in your head.

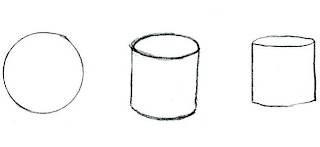
- Make a rough sketch. If you're drawing a tree, don't draw one leaf at time. Imagine what you want the tree to look like ultimately, and make a light sketch with a pencil. You can draw an outline of your intended drawing, or you can draw its "skeleton" (as is often done with drawing bodies). Another option is to imagine the basic shapes the object is made of. In other words, break the object apart with your mind. A tree, in most cases, is an oval or triangle centered on top of a cylinder. Draw both shapes in 3D so that you can fill in the details later, while maintaining the proportions you want. Otherwise, it's easy to get caught up in drawing one section of the object and forget about the "big picture" so that you end up running out of room, or, more often, your drawing ends up looking unattractively imbalanced.

- If you're drawing a real object, cross check what you have on paper with the original object. Make sure that the sizes of the shapes relative to each other are as accurate as possible.
- If you're drawing a real object, cross check what you have on paper with the original object. Make sure that the sizes of the shapes relative to each other are as accurate as possible.
- Elaborate. Use heavier/darker line to bring out the parts of the drawing you need, and use an eraser to take out the lines you don't need. Add details, bit by bit, making sure to frequently step back and look at your drawing as a whole to make sure it's coming along the way you want it to. Learn and experiment with several techniques, which can enhance your ability to express ideas through drawing:
- Shading - Details the curves and/or shape of an object through the differentiation between light and dark. Think about the way the light hits an object and which parts of the object are light or dark as a result. This can add luminosity, intensity, and depth to a drawing.

- Perspective - Things that are further away appear smaller. If you are drawing a large object (such as a building) or a complicated scene (such as a neighborhood), it's especially important to understand perspective (if you don't want your drawing to appear cartoon-ish), but focusing on perspective when drawing small, simple objects (a cube, a stack of books) is an excellent exercise in drawing.

- Proportions - The way different parts of the object relate to each other in terms of size can affect how realistic the drawing is perceived to be. Altering proportions (by exaggerating some aspects and minimizing others) can convey unique ideas, or represent a certain style of drawing (especially with characters, as is seen in caricatures and anime).
- Color - Adds a new dimension to a piece. Contrast, blending, saturation, and color schemes make some drawings more lively, or more realistic, or abstract, depending on how the color is applied.

- Tools - Different shades of pencils (HB,2B,3B,4B...), using a sharp point, blunt point, the side of the pencil, pens, felt-tip pens, chalk, and so on.

- Shading - Details the curves and/or shape of an object through the differentiation between light and dark. Think about the way the light hits an object and which parts of the object are light or dark as a result. This can add luminosity, intensity, and depth to a drawing.
- Draw as often as you can. The more you practice, the better you'll get. Even when you're concentrating on something else but your hands are free (such as when you're on the phone--the perfect opportunity to doodle) take a piece of paper and a pencil and start drawing basic shapes (circles, squares, triangles, rectangles, etc.). Challenge yourself progressively by making these shapes as perfect as possible. Then challenge yourself some more by drawing variations of a shape: different sizes of circles and squares, different kinds of rectangles and triangles. With enough repetition (and crumpled sheets in the recycling bin), you should reach a point where you could comfortably draw most shapes. To heighten this basic skill, draw curves and curls as well. Try doing springs and spirals and various loops, curlicues and garlands, paying attention to the consistency of your curves.
- 'Keep your work. Make a place where you can put all of your drawings, or keep it all together in an art journal. Doing this will help you review your progress. The more you get used to drawing, the more you'll be able to see what your flaws are and determine how to correct them. Also, as you continue drawing, you'll develop your own personal style. It's always interesting to look back and see how your ability to express yourself has grown. Don't let yourself down. When you practice you can make it perfect.

- Try a timed gesture drawing. If you find yourself struggling with proportion, annoyed that your poses are stiff and worst of all making and erasing mistakes that your conscious mind knows better, this is a great way to break that cycle. Get a kitchen timer. Set it for five minutes. Choose a subject that's not going to move like a silk rose, something a little challenging that you're fond enough of it to draw it more than once. It helps if you really like the subject. Using a soft (B grade or 2B or 4B, any of the B pencils) pencil, try to sketch it within five minutes or two minutes, set a specific time period no longer than five minutes. When the buzzer goes off, stop even if it's not finished. Try again on a fresh part of the page.
- Each time you try to draw something within five minutes, you'll observe something different about it and concentrate. You'll be correcting mistakes without bothering to go back and erase them.
- This method is especially good for drawing people since it's not hard to get a friend to pose for a two minute "gesture sketch" as opposed to making them sit still for an hour.
- Once you have done gesture sketches of a subject, giving yourself a longer time like fifteen minutes will feel like you have forever to get it right. You'll probably finish before the time is up. This is very good practice for being able to draw outdoors when the light can change in half an hour.
- Try drawing your cat or dog while it's sleeping in short gesture drawings. Two minutes is about as long as a sleeping animal holds still before it rolls over or moves in its sleep.
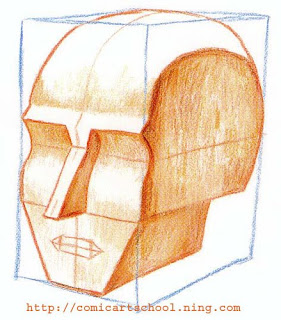
- Try drawing something simple like a pencil. Things that are common and easy to draw. Practice the object you chose a few time until it looks right like it is supposed. Then once you think it looks right go onto harder things such as a human face. Now to start your human face you must start with regular shapes like a circle. Most common heads are shaped like an upside down egg.
- Each time you try to draw something within five minutes, you'll observe something different about it and concentrate. You'll be correcting mistakes without bothering to go back and erase them.


Video
Speed drawing of a realistic portrait.Tips
- Keep trying and don't give up if you do poorly the first time.
- Date every sketch and drawing. It's good for morale to see how much you've improved, over weeks and months progress can become dramatic.
- The secret to making professional quality drawings is to include line, shape, value, texture, and color. Most everyone starts with lines which they use to create shapes. Often beginners stop there. A drawing should have something in it that is completely white, something pitch black, and many values in between. You should show what in the drawing is smooth and what is rough. Adding even one or two colors to a gray pencil drawing will add a lot of interest.
- Use measuring techniques like a grid method or tick marks for accurate proportions. This is something that gets better with practice at a particular subject like people or cats or birds.
- Another secret to drawing realistic pictures is trying to make them look three-dimensional. This is done not only with shading but texture and the direction of lines. For example, if you draw a ball, make the lines curved.
- The joy of drawing is being able to draw freely, so go easy on yourself when you feel you're not progressing as fast as you want to. It's always OK to make mistakes. Even the best artists make mistakes when they're drawing as part of routine.
- Vary what you draw. For instance, work on drawing inanimate objects, then take a break and work on people the next day. This keeps your brain fresh and prevents you from becoming frustrated.
- Remember, as the famous author James A. Owen once said, "Drawing is just two things, putting lines on paper, and deciding where they go."
- Art students that wish to stand out from the rest of the class should draw with colored pencils.
- Use 'rough' paper and pencil that's used on one side for your doodles or practice sketches. Save your money and trees by saving good paper for your best work.
- Also, one of the best things you can start out doing is just doodling! And once you finish doing that, move on and then start being a critic to your work, add detail and soon you're on your way.
- Also, when you slant the lead (or graphite) of your pencil, those can be used as shading techniques.
- Find inspiration in everything. News stories, landscapes, emotions, anything can be drawn realistically or abstractly.
- Some of the best art has the best shading. If you master shading you're off to a great start. Remember practice makes perfect.
- Pay attention to critique and use it to improve. It's common for amateurs to take offense from critique, but usually, it's not meant badly. Acknowledge flaws in your art and try to overcome them.
- Take an art class. You can learn many techniques and tips from professionals. Don't be afraid about your talent level- art class isn't about showing off, it's about learning and sharing new things from others.
- Remember that your best is your best. Do not compare yourself against other professional work.
- Drawing is an art, and takes great precision, but you can learn to draw. You don't have to be naturally good at it, you just have to be able to take some time to learn!
Warnings
- Show your work to other people at your own risk--you should only present your work to those you know who'll encourage you. Ask them to be honest, then improve using the feedback.
- People may very well make fun of you; ignore them. If they knew anything about art they would know that drawing takes a lot of hard work to succeed at it.
- Always be open to critique if you are going to show your work.
- It is recommended to draw larger because as drawings get smaller and smaller, even a minor blister or mark here and there can dramatically alter its appearance, especially if you are drawing a face.
- it's also recommended to draw small images if you don't know exactly how the final drawing should look like: they do take less time to draw, and you don't have to go into detail at your first sketches.
- Learn to distinguish helpful critique from discouragement. Critique is always specific and usually provides suggestions to improve. Discouraging comments get personal, may include insults and tell you things like "give up, you have no talent." Ignore and avoid any discouraging responders. Show your art to people who draw better than you do for helpful critique.
Related wikiHows
- How to Think of What to Draw
- How to Make a Ribbon in Adobe Illustrator
- How to Draw a Human Head
- How to Ink a Drawing
- How to Choose a Pencil
- How to Draw Real Things
- How to Draw a Cylinder
- How to Improve Your Anime/Manga Drawing Skills
- How to Cheat at Drawing
- How to Draw With Realistic Shading
- How to Draw Real Things
- How to Create Wet Chalk Drawings
- How to Do Pencil Drawings
- How to Take Your Drawing Skills to the Next Level
- How to Be a Pro Mangaka
- How to Draw a Lake
- How to Develop the People You Draw