
How to Draw Realistic People
from wikiHow - The How to Manual That You Can EditPeople are arguably the most difficult subject to draw realistically. Read on to discover the rules of drawing a realistic face as well as a realistic figure.

Steps
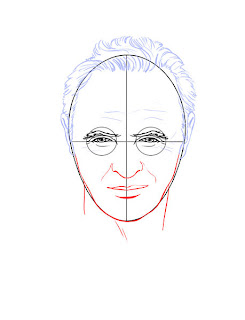
Draw a Face- Draw an upside-down egg, then divide it into quarters with straight lines. This is the blueprint for the head; the lines will help you position the facial features correctly, so be sure to center them well.
- Don’t draw the intersecting lines in ink because you’ll want to erase them later.

- Don’t draw the intersecting lines in ink because you’ll want to erase them later.
- Draw the eyes on the horizontal line. Be careful not to draw each eye in the exact middle of the left or right side of the face; most people’s eyes are not this widely spaced. The two eyes (excluding lids, brows, etc.) should have just enough space between them to fit a third eye.
- Start by sketching big circles to give yourself a sense of where the eye sockets are. Again, don’t draw these in ink.
- To begin the eyeball itself, center an almond shape within each circle.
- Fill in the pupils and irises, which should be partly covered by the upper lid; completely visible irises will make your subject seem frightened.
- Draw a bow-shape over each eye to suggest an upper eyelid.
- Draw a smaller, shorter bow-shape beneath each eye to suggest a lower eyelid.
- If you’re drawing a woman, add lashes. Resist the urge to draw them strongly vertical or across the entire upper eyelid; they should be gently arched, fairly horizontal, and only come out of the outer 1/2 to 2/3 of each eyelid.
- Near the top of each eye socket, add an eyebrow. Women’s brows tend to arch higher away from their eyes than men’s, which are usually lower, thicker, and flatter.

- Start by sketching big circles to give yourself a sense of where the eye sockets are. Again, don’t draw these in ink.
- Add a nose and mouth.
- Draw the nose. An easy way to do this is to draw only the very bottom of the nose and not the sides.
- To form the very bottom of the nose, draw a slightly downward-curving horizontal line. This should be centered both horizontally and vertically in the bottom half of the face.
- To form the walls around the nostrils, draw a "C" shape on either side of your curved line. It may help to think of these as parentheses.
- If you want to form the sides of the nose, do not draw lines; instead, suggest soft edges by adding a slight shadow with a blending stump.
- To form the very bottom of the nose, draw a slightly downward-curving horizontal line. This should be centered both horizontally and vertically in the bottom half of the face.
- Draw the mouth. The top of the mouth should be closer to the nose than the bottom of the mouth is to the tip of the chin.
- To form the line between the lips, draw a gently waving horizontal line. Experiment with a few shapes to form the expression that you want.
- Draw a gently M-shaped line to form the upper lip. The higher above the center line, the fuller the lip will look.
- Draw a gently U-shaped line to form the lower lip. Most people’s lower lip is slightly fuller than the upper.
- Once you get the hang of the lips, experiment by making them smile, frown, show teeth, etc.
- To form the line between the lips, draw a gently waving horizontal line. Experiment with a few shapes to form the expression that you want.
- You can also add wrinkles, spots, and anything else you can think of to make it look more realistic.
- Draw the nose. An easy way to do this is to draw only the very bottom of the nose and not the sides.
- Erase all unwanted guide lines.


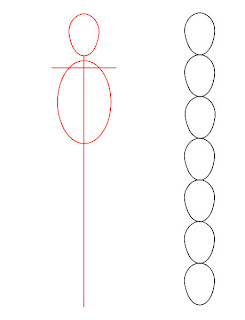
- Sketch the head, torso, and length of the body with lines and ovals. A proportionate body is usually the length of seven stacked heads.
- Draw an upside-down egg where you want your subject’s head to be.
- To one side of your paper, draw seven eggs, the top one aligning with your subject’s head.
- Draw a straight line coming down from the bottom of your subject’s head. Use the stacked heads to measure how far down the line should go.
- Draw a t-bar underneath the head, leaving room for the neck.
- This line should be about 1/3 of a face-length away from the bottom of the head and will form the basis of the shoulders.
- Be sure each half of the line is no longer than the subject’s head.
- This line should be about 1/3 of a face-length away from the bottom of the head and will form the basis of the shoulders.
- Using the t-bar as a marker, draw an oval to indicate the chest. The chest should be about 1/3 the length of the body.
- Draw an upside-down egg where you want your subject’s head to be.
- Sketch a complete body structure with lines and ovals.
- Draw lines down from the t-bar to indicate arms. Make sure that they aren't stock straight; no one has arms that don't bend a bit at the elbow, even when still.
- At the bottom of the chest-oval, draw a rectangle to indicate hips. Note that the hips will be different, depending on whether you're drawing a man or a woman.
- For the legs, draw lines down from the left and right corners of the hip box.
- The knees will be about two stacked oval lengths down the legs.
- The calves will be roughly the length of 1 1/2 ovals.
- The knees will be about two stacked oval lengths down the legs.
- Draw ovals to indicate feet.

- Draw lines down from the t-bar to indicate arms. Make sure that they aren't stock straight; no one has arms that don't bend a bit at the elbow, even when still.
- Flesh out your person. Unless you’re drawing a nude, be sure to plan your subject’s outfit.
- Draw lines to indicate a neck. Remember that men usually have thicker necks than women.
- Add clothes. Be sure to include folds and wrinkles so that they look realistic.
- Keep in mind when that the clothing should show body structure underneath. In other words, the wrinkles in the clothing should flow with the form of the body.
- Clothing your subject is a great way to avoid drawing troublesome body parts. For example, if you haven’t perfected drawing hands – and who has?! -- simply put your subject’s hands in their pockets. Add scarves, boots, skirts, and other accessories as needed.
- Keep in mind when that the clothing should show body structure underneath. In other words, the wrinkles in the clothing should flow with the form of the body.
- If you decide to draw a nude, pay extra attention to defining muscle structure.
- Erase all unwanted guide lines.

- Draw lines to indicate a neck. Remember that men usually have thicker necks than women.


Video
Tips
- The best way to improve, in all cases, is to draw from life. Find a real-live thing to draw, or at least a picture, and get to it!
- If you're still having trouble with the torso, draw the outline of the rib cage before you start on the final body lines. This will help you see where the pecs and six-pack (or gut) go.
- Always add little bits of shading as you draw to add depth and improve your drawing skills.
- Consider joining websites such as deviantART to share your art, study others', stay motivated, and get feedback and advice on your work.
- Trace over pictures of people with tracing paper for practice. When you get better, draw by copying the pictures and pay attention to how you're placing or emphasizing the details.
- Use plain copy paper if you are just getting started.
- A number 2 pencil is fine for most drawings.
- Use vine charcoal to do loose sketches and to place the lines for faces, etc. Be forewarned that too much shading can make a face look old.
- Borrow library books on pencil and charcoal drawing and study the techniques of others. Many will have lessons on shading and other subjects that can teach you a lot. Just remember that no one book, or artist, can teach you the 'perfect' way to draw. Everyone has different styles; learn from them, but use it as a springboard to creating your own style. And most important of all: practice, practice, practice!
Warnings
- When drawing from life, try not to rely too heavily on movie stars and other famous faces for inspiration. Not only will that irritate more advanced artists who are critiquing your work (as it is a very common approach), but it is just as important to be able to draw an average man on the street as it is to be able to draw Brad Pitt.
Things You'll Need
- Pencil
- Paper
- Eraser
- Blending stump (optional)
- Time and a lot of patience
Related wikiHows
- How to Draw Realistic Hands
- How to Draw Realistic Hair
- How to Draw a Human Head
- How to Draw a Sea Turtle
- How to Enlarge and Draw Perfect Drawings
- How to Draw a Basic Stick Figure
- How to Master the Etch a Sketch
- How to Draw Human Eyes